Buying art can quickly turn into a headache when you bring it home and realise you can't figure out where to hang it or how to hang it safely. What wall should your lovingly selected piece be arranged on? How can it be arranged? And, possibly most importantly, how can you make sure the carefully hung art piece won't come smashing to the floor.
Our Creative Director, gives some pointers on how to arrange wall art and how to ensure it stays put once it's up there.
The basics
First and foremost, select your tools. Contrary to popular belief, you don't need industrial strength screws, a hard hat or a health and safety risk assessment before you start. With most art, it's all to do with the mechanism on the back. If there is a wire, it can be hooked over a nail, screw or a picture hook. The placement of screws are more accurate than nails because if you bang a nail in wrong or the wall chips, you have to choose a new position.
If the artwork is large or in a horizontal format i.e. wider than it is high, it is probably better to hang it on two hooks. But the downside to this is that you have to be exact. If the two points are not exactly level, the picture will hang lopsided! Otherwise, it is easier to have one point of hanging - it's easier to find the central point. Use your common sense by thinking about the size and weight of the artwork you're hanging.
If there is no wire or mechanism on the back, how can you attach one? Firstly, what material is the art piece? If it's in a wooden frame you could just screw in an eye hook to the back which would hang over a screw or an L shaped screw. If there is an indent or ledge (i.e. from the picture frame), this works perfectly to just hang over a screw. Otherwise, a picture hanging mechanism could also work.
Moving on to adhesives. How heavy is the piece? Do you want it permanently installed? There are some amazing adhesives out there, such as no more nails and cement glue, but they will stick forever. Most products will state the maximum load i.e. how much weight it can hold, and the type of material it is suitable for. Silicon is also a great permanent option for smaller, lighter pieces.
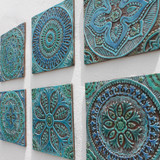
The concept of the G.Vega wall art tiles, is that the tiles hang flush with the wall. Our tiles have a deep indent which hook over a screw head. This ensures they don't hang at an angle, don't wobble and this is a non permanent hanging solution. If you move house, you can take your art with you! Once installed, you could also add a drop of silicon for extra security in windy areas.
Inspire me
So, you've brought your wall hanging home and you're lacking any creative flare on where it could go and how it could be arranged.
First and foremost, start with the height. A wall hanging should be at eye level, which is about 60 inches from the floor.
Find a friend. Before hammering in nails, ask them to hold the piece in place, then take a few steps back so that you get a sense of how it will look on the wall. If there's a bare wall crying out to be decorated, fill it. But if you're not sure how to position your piece, think about how it will work around the furniture i.e. will you be able to see it from wherever you are in the room? If your art is the main focal point in the room, consider placing lights strategically to illuminate the piece.
If you're hanging multiple pieces, like our wall art sets, you don't have to place them in a grid. Art can look great as a cluster, starting from the middle and working outwards. At G.Vega, I like to place the largest ceramic tile in the middle and scatter the other tiles around, like they're bursting out from the one piece. Play with the negative space - you don't have to completely fill the area. Art doesn't have to be symmetrical or matchy. Have confidence to mix and match colours, patterns and asymmetry.
Try something different. We've seen our wall art being hung within picture frames which can really set off the designs, especially when the frame is a contrasting colour to the ceramic.
